Want more email subscribers? Have you considered paying Facebook to help grow your list?
In this article, you’ll discover how to improve the chances that you acquire and keep email subscribers.
Why Combine Facebook Ads With an Email Nurture Sequence?
No matter what type of online business you run, your email list is the most important asset you have for increasing your sales.
Relying solely on social media audiences isn’t a good idea because you’re depending on a third party you can’t control. You’re constantly battling with an algorithm to get your content shown to a small percentage of your audience. And if your pages get hacked or closed down, you lose your contacts immediately.
Your email list is the only reliable way to collect customer contact details so you can communicate with your whole audience without having to rely on a third party. We have been a partner with Constant Contact since 2008 and recommend them.
Facebook ads are an effective way to gain the email addresses of your Facebook and Instagram audiences and add subscribers from a wider audience who may not already know you from your organic marketing. Here’s how to combine Facebook ads with an email nurture campaign to capture and retain new subscribers.
Related article: 6 Reasons Why Building an Email List is so Important
#1: Create a Lead Magnet or Offer
Inboxes are crowded these days so asking someone to hand over their email address should be considered a value exchange. You may need to sell the proposition similarly to selling a product or service, despite no financial exchange being made.
Service-based businesses will often offer a lead magnet in exchange for an email address. A lead magnet is content that your subscriber wants or needs and will be willing to exchange their email address for. This could be a PDF checklist or guide, a video series, or even a quiz. Whatever form it takes, your lead magnet should provide incredible value.
Because this will be your subscriber’s first contact with your business, you need to make a good first impression and give them exactly what you promise. Where possible, strive to over-deliver because subscribers may base future decisions to spend money with you on the value they take from this first interaction with your business.
An eCommerce business will often offer a discount in exchange for an email address; for example, 10% off your first order or free shipping. Make sure this offer is something your customers will want. Free shipping isn’t going to tempt them to part with their email address if they would only be spending a couple of dollars on shipping anyway.
Pro Tip: Offers are always worth testing. Some people place more value on free shipping than a 20% discount even if the 20% discount would save them more in total.
#2: Prep Your Website
When collecting subscribers organically, many online businesses will use a pop-up or banner; however, when using Facebook ads, a full opt-in page is needed to ensure there’s only one option for the visitor to take: subscribe to your email list.
A stand-alone landing page ensures page visitors won’t be able to simply close the pop-up, and with no other distractions, they’ll be prevented from navigating away. That means no menu bar, no other links to different pages, or alternative offers. It should also include one clear call to action (CTA) that will persuade them to subscribe. Ask us how to do this for you.
Your landing page should be mobile-optimized because most of your traffic is likely to be via mobile when using Facebook ads. It should also load quickly to ensure people stick around to see the page load so they can sign up.
You can build a landing page on your existing website or use a landing page builder. Some email service providers also offer integrated landing page builders.
Create a Success Page
Once someone has subscribed to your list via the sign-up page, they should be shown a success message, either on the same page or by redirecting them automatically to a separate page.
When using Facebook ads to grow your list, it’s best to use a separate success page (also known as a thank-you page) so you can track the number of leads more accurately using your Facebook pixel. The success page should show the user that they have successfully subscribed. It should explain the next steps so they know what to expect such as how they can access their lead magnet, claim the offer, or any other relevant instructions.
Pro Tip: Adding another CTA or an upsell on your success page will give your subscribers the next step toward buying from you. The sooner you can get a new subscriber to spend money with you, the better. The success page is a good place to try to get that first sale.
Install the Facebook Pixel on Your Sign-Up and Success Pages
To accurately track your Facebook ad campaign, you’ll need to install the Facebook pixel on both the sign-up and success pages. With the same pixel ID on both pages, add the View Content event code to the sign-up page. You can find out how to do that here.
Then add the Lead event code to the success page. I recommend adding it to the success page rather than the call-to-action button to ensure that it doesn’t track if someone clicks the button without submitting their details. This will ensure your data will be more accurate within Facebook Ads Manager.
#3: Set Up an Email Nurture Sequence
Once subscribers have provided their details, they’ll expect to receive your lead magnet or offer in their inbox. The Constant Contact email marketing platform provides the ability to tag a new subscriber depending on where they came from. Then you can automatically email the correct lead magnet or offer based on the tag.
You’ll want to set up an automated nurture sequence to move the relationship forward so that once the lead magnet or offer has been delivered, the subscriber will receive another more detailed email welcoming them to your world.
Rob & Kennedy, The Email Marketing Heroes, explain that emails need to deepen the relationship between you and your subscriber and offer them an opportunity to further understand and build desire for your products or services.
Make sure your emails aren’t taking people in circles. Instead, they need to lead them further down the journey to becoming a customer.
With this in mind, it’s a good idea to craft your first email to welcome new subscribers and explain what they can expect from you in future emails. Your nurture sequence should then move those subscribers through a journey to get to know what you stand for and how your business is different from others.
This is a screenshot of the first email in a sample company’s nurture sequence. You’ll notice they provide links to useful content and encourage readers to engage with them on other platforms too. They also tell people to watch for the next email and give them the subject line to build anticipation.
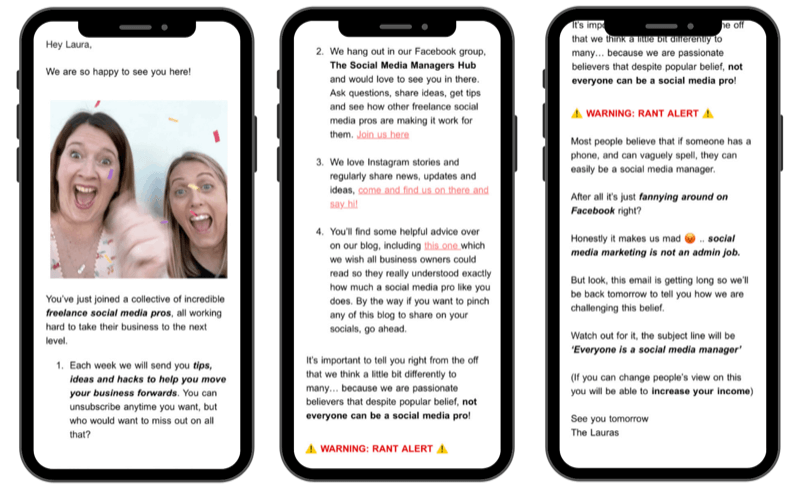
When each email leads to the next, the reader will look forward to receiving it so you won’t need to worry you’re emailing them too often.
Just as with your social media content, your email nurture sequence should encourage engagement from day one by inviting readers to reply, click a link, or forward it to a friend. This engagement will not only build a relationship with your audience but also increase the deliverability of your emails.
By sharing how your business is different in your opening nurture sequence, you’ll start to build a relationship quickly and find that subscribers will reply to your emails just as they would reply to a post on social media.
Now let’s look at the elements of a nurture sequence.
Deliver the Lead Magnet in the First Email to Your New Subscriber
The first email you send your new subscriber will deliver the lead magnet. Constant Contact can automatically resend the lead magnet or offer if this first email isn’t opened.
Related article: How to Write an Email Subject Line That’s Sure To Get Clicked
If you have several lead magnets or offers, you may elect to include very little other information in this first email. By doing so, you can put all of your new subscribers into the same nurture sequence rather than a separate one for each lead magnet.
The first email in the nurture sequence can automatically be sent to your subscriber within 10–30 minutes of them joining your list (but after the email delivering the lead magnet or offer). This email will welcome them and explain what they can expect from you.
Before ending this first email, open the loop so your reader anticipates the next email and knows when to look out for it.
Start Building a Relationship in the Next 3–4 Emails in the Sequence
Your nurture campaign should have another 3–4 emails, all with the aim of building a relationship with your readers. Again, each email should open the loop to the next email while also bringing them closer to the next step in the buyer’s journey.
You can do this by offering something of value to your subscribers such as a blog, video, or podcast episode that they can click through to. This increases your engagement and delivers something of value.
At the end of your initial nurture sequence, your subscriber will be used to hearing from you and be left wanting more. You’ll need to decide how often you’ll communicate with them. At this point, we suggest emailing subscribers a couple of times each week.
#4: Create a Facebook Ad Campaign
Now that you have everything set up, it’s time to move into Ads Manager to create your Facebook ad campaign to bring people to your sign-up page.
When it comes to generating leads, Facebook offers two campaign options: Conversions and Lead Generation. If you don’t have a website and don’t want to invest in a landing page builder, choose the Lead Generation objective, which offers a built-in form builder. However, my preference would always be to use the Conversions objective with a purpose-built landing page and success page with the Facebook pixel installed on both.
In Ads Manager, click Create to set up a new campaign and then select Conversions as your objective. Name your campaign something memorable so you can easily find it again in the future.
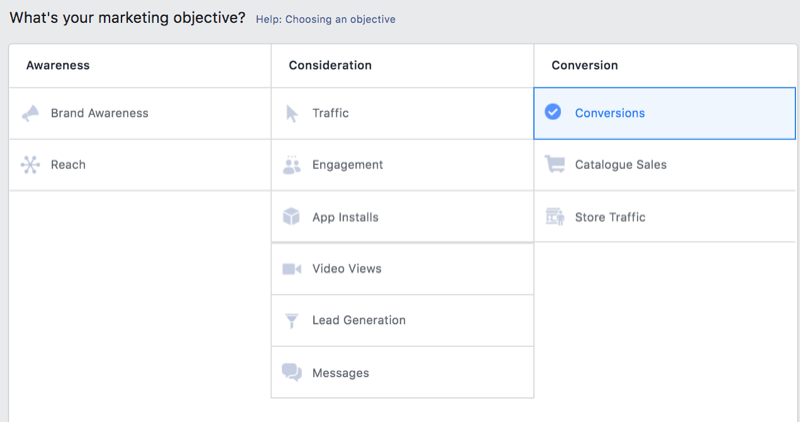
If you’re new to using Facebook ads, leave all of the other settings as they are and continue to the next step to create your ad set.
At the ad set level, set your conversion as shown below to allow Facebook to send your audience to your website and optimize for the Lead event on your pixel. This instructs Facebook to show your ads to the people within your audience who are most likely to complete the action of subscribing to your email list. The algorithm will know that someone has subscribed when the Lead event fires, as you put that event code on the success page.
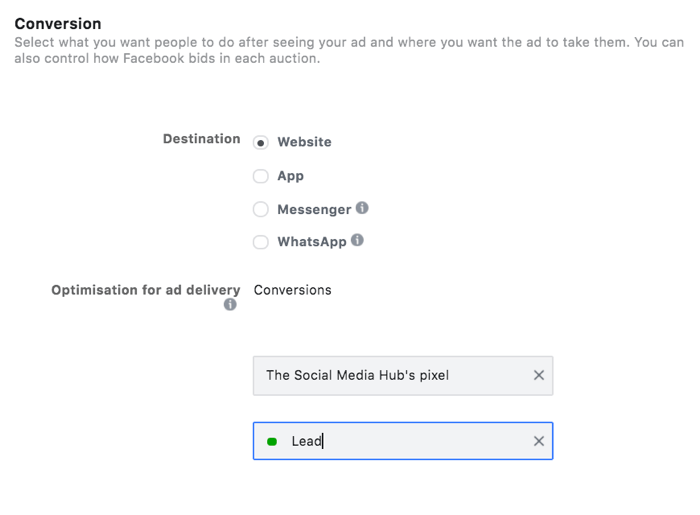
If, when setting this up, you see a red dot instead of the green one shown above, it means the page has had no recent traffic to fire the event code. Once someone reaches the page with the event code, the event will fire and that dot will turn green.
Next, you’ll choose who to show your ads to, where they’ll be displayed, and how much you’ll spend.
You can instruct Facebook who to display your ads to by creating an audience. If you’re aiming to get new subscribers from a cold audience, you can use a lookalike audience or create a new audience using demographics and interests.
If you want to get the email addresses of people who have already engaged with you on Facebook or Instagram, you can create a custom audience. You’ll have various options to choose from, including people who have engaged with your Instagram shop.
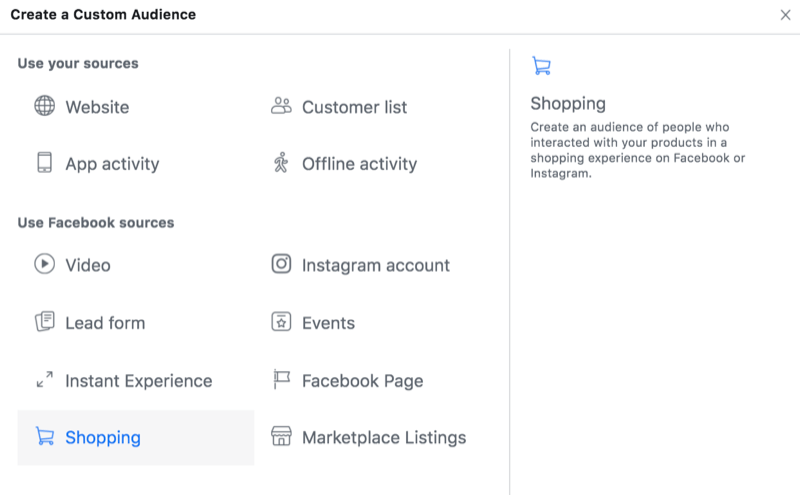
Pro Tip: Always try to get the email addresses of your social media audience so you have a way to communicate with them (even if Facebook or Instagram go down). This way, you won’t be reliant on a third party for your business.
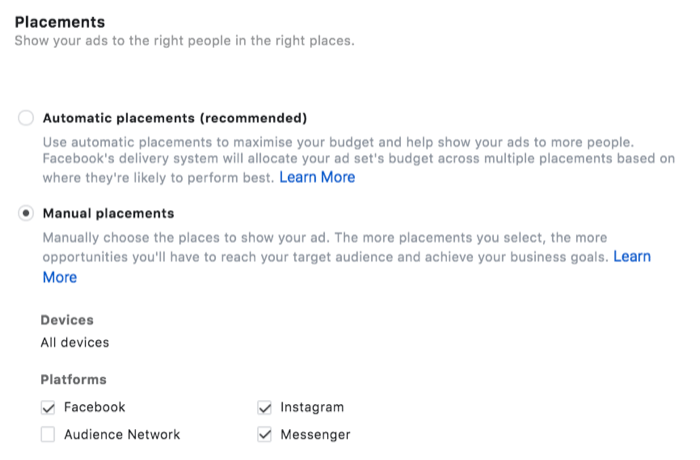
Next, you’ll select your placements. Facebook currently gives you four main platforms to display your ads: Facebook, Instagram, Messenger, and Audience Network. From experience, the Audience Network is unlikely to deliver the results you want from a campaign to gain email subscribers so I suggest you turn that placement off by unchecking the box.
Finally, complete your ad set by setting your budget for the campaign.
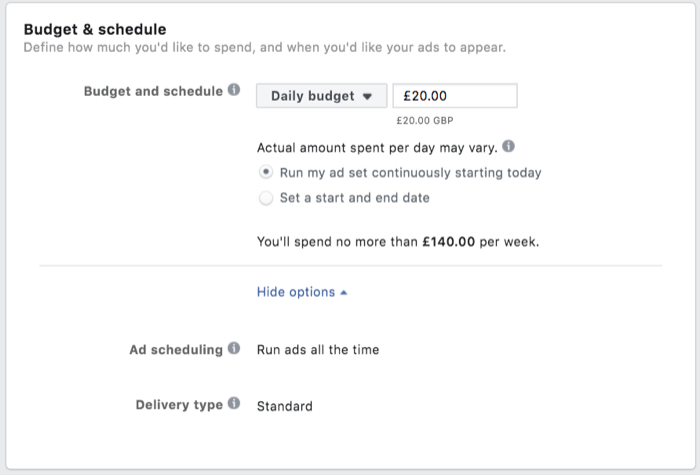
Once your ad set is complete, you can move on to creating your ads. You should always have at least two ads running so you can test different versions to get the best results from your budget.
Ensure that your ads position the lead magnet as the answer to your audience’s problems so they’ll be encouraged to click through to find out more.
Related article: 3 Social Media Hacks to Help Your Content Go Viral
#5: Track Your Success
Once your ads are running and starting to generate data, you can monitor their performance and make changes as needed.
You’ll see the total number of events registered in your Events Manager. In Ads Manager, you can see more granular data to understand how many leads were generated as a direct result of your Facebook ads.
![]()
Throughout your campaign, you should monitor the link click-through rate (CTR). A well-performing ad will show a CTR of 1%+ for a cold audience and 2%+ for a warm audience.
A low link CTR can signal that your ads aren’t stopping people from scrolling, or the copy or CTA isn’t compelling enough to cause your audience to take the action to click. If your stats are lower than expected, you should test new creative or a stronger CTA.
It’s also advisable to keep an eye on the drop-off between link clicks and landing page views. These numbers are unlikely to be the same but a dramatic decrease means that people aren’t waiting for the landing page to load. And that could be a signal of slow page-load speed.
The key numbers to consider when using Facebook ads to grow your email list are the total number of results and the cost per result. How much you’re willing to pay to generate a lead will depend on several internal factors including your conversion rate from your email marketing and the lifetime value of a customer.
Conclusion
Facebook ads can be a very effective way to grow your email list, provided you offer something of value to your target audience. Make sure your Facebook ads and your landing page have a strong CTA to persuade the visitor to exchange their email address for your lead magnet or offer.
What do you think? Are you inspired to try combining an email nurture campaign with Facebook ads? We do this every day and are happy to help you take on this fantastic marketing program. Contact us today to learn more about how we can work with you.
Share your thoughts in the comments below.
More helpful articles:
- 5 Ways To Boost Your Search Engine Ranking and Social Media Conversions
- Customer Loyalty: Ten Ways to Earn More Repeat Buyers
- Helping your business through COVID-19






Leave A Comment
You must be logged in to post a comment.